Serve a machine learning model using Sklearn, FastAPI, and Docker.

In this post, you will learn how to:
* Train and save a machine learning model using Sckit-learn
* Create an API that can take incoming predictions requests
* Get your API running using Docker
* Test your API performance with Locust
Machine learning is one of the hottest topics in data science; there are many resources about how to train your model, from data cleaning, feature selection, and choosing between many candidates and fine-tuning them.
At this point, everything must be working great on your computer. Still, when it comes to deploying your model so other users or systems can use it, it comes with several challenges such as speed of predictions, infrastructure compatibility, and service scalability.
Let's see how to approach this; our project structure will be the following:
iris-api/
│
├── models/
│   ├── ml/
│   │    ├── classifier.py
│   │    └──traing.py
│   │    └── iris_dt_v1.joblib
│   └── Iris.py
│
├── tests/
│   ├── load_test.py
├── app.py
├── Dockerfile
├── LICENSE
├── README.md
├── requirements.txt
└── .gitignore
Let's break it into parts.
1. Training the model
Sckit-learn, it's probably the most popular framework for classical machine learning in python; it has an easy-to-use API that supports the most common models.
Data set:
In this project, we'll use the Iris data set to train a classification model.
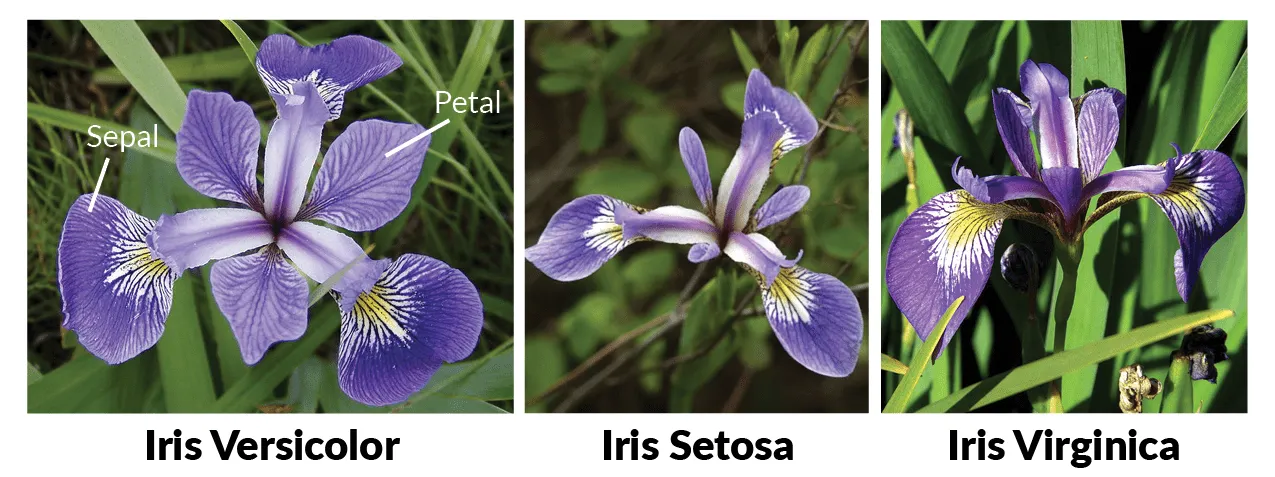
Iris data set comes with four features:
- sepal length in cm
- sepal width in cm
- petal length in cm
- petal width in cm
These features are used to classify each observation between one of three classes: Iris Setosa, Iris Versicolour, and Iris Virginica.
First, let's set up out train.py, import the methods and iris data, set the features to a NumPy ndarray called X, and the prediction categories to variable y.
from joblib import dump
from sklearn import datasets
from sklearn.pipeline import Pipeline
from sklearn.preprocessing import MinMaxScaler
from sklearn.tree import DecisionTreeClassifier


iris = datasets.load_iris(return_X_y=True)
X = iris[0]
y = iris[1]
Now, let us create a simple model, remember the main topic of this post isn't model training, so we'll keep it as simple as possible.
As preprocessing step, let's scale our variables and use a decision tree classifier with the default parameters for model training.
clf_pipeline = [('scaling', MinMaxScaler()),
                ('clf', DecisionTreeClassifier(random_state=42))]
pipeline = Pipeline(clf_pipeline)

pipeline.fit(X, y)
And as the last step, let's save the trained model so we can use it with our API to make predictions
dump(pipeline, './iris_dt_v1.joblib')2. Creating the API
According to FastAPI author:
FastAPI is a modern, fast (high-performance), web framework for building APIs with Python 3.6+ based on standard Python type hints.
Very high performance, on par with NodeJS and Go (thanks to Starlette and Pydantic). One of the fastest Python frameworks available.
It will allow us to serve our machine learning model.
Before creating the predict method endpoint, we'll define our Iris model, so we let FastAPI know what we expect as request data; in our iris.py file, write
from pydantic import BaseModel, conlist
from typing import List


class Iris(BaseModel):
    data: List[conlist(float, min_items=4, max_items=4)]
With this code, we'll ensure that we get a list (or several lists) with the four variables that the model needs to make the prediction.
On the classifier.py, use
clf = Noneclf will work as a placeholder so we can import and reuse our model
Let's now create an endpoint to send prediction requests; first, we need to import the main FastAPI method, the placeholder, and iris model we just created in our app.py
import models.ml.classifier as clf
from fastapi import FastAPI, Body
from joblib import load
from models.iris import Iris

app = FastAPI(title="Iris ML API", description="API for iris dataset ml model", version="1.0")
Now, we need to get our trained model; we'll make sure that FastAPI import the model only when the app gets started and not in every request because this could add extra time in our prediction that we want to avoid, you must be careful in other scenarios, where having the model in memory may be a wrong decision. In this case, as we want to make real-time predictions and with such a small model, we are ok.
So let's read the model and assign it.
@app.on_event('startup')
async def load_model():
    clf.model = load('models/ml/iris_dt_v1.joblib')
Next, we define the route that will take our requests; it will be a post method to /predict.
This method will take our Iris model to ensure that the request data format is correct and will return our class prediction and the log probabilities for each class.
@app.post('/predict', tags=["predictions"])
async def get_prediction(iris: Iris):
    data = dict(iris)['data']
    prediction = clf.model.predict(data).tolist()
    log_proba = clf.model.predict_proba(data).tolist()
    return {"prediction": prediction,
            "log_proba": log_proba}
Note that our function is async; FastAPI supports async methods out of the box.
Our base API is ready! by now, the app.py file looks like this
import models.ml.classifier as clf
from fastapi import FastAPI
from joblib import load
from models.iris import Iris

app = FastAPI(title="Iris ML API", description="API for iris dataset ml model", version="1.0")


@app.on_event('startup')
def load_model():
    clf.model = load('models/ml/iris_dt_v1.joblib')


@app.post('/predict', tags=["predictions"])
async def get_prediction(iris: Iris):
    data = dict(iris)['data']
    prediction = clf.model.predict(data).tolist()
    log_proba = clf.model.predict_log_proba(data).tolist()
    return {"prediction": prediction,
            "log_proba": log_proba}
Let's start it by running:
uvicorn app:app --port 5000Now go to: http://127.0.0.1:5000/docs, your screen should look like this:

Great! Our API is up and running, and we get a nice swagger for documenting and testing our API, another of the excellent features of FastAPI.
Let's go to our predict endpoint and click on try it out; we'll send two observations.

You can also try it from your terminal or any other client as Postman
curl -X POST "http://127.0.0.1:5000/predict" -H\
 "accept: application/json"\
 -H "Content-Type: application/json"\
 -d "{\"data\":[[4.8,3,1.4,0.3],[2,1,3.2,1.1]]}"
And here we have our response; it tells us that the predicted class for our first data point is the 0 class, which corresponds to Iris Setosa, and the second point is Iris Versicolour, it also gives us the log probability for each category and you could add more helpful information in the response

You can also try to send 3 of the four variables to the request and see how FastAPI handle the verification (you could add a status code here)

3. Run with Docker
At this point, everything is probably working on our computers. Still, when you deploy it to your favorite app hosting, there are no guarantees that the system will have all the dependencies that we need to get our API running, so here comes Docker to help us overcome this.
From Docker official page
Developing apps today requires so much more than writing code. Multiple languages, frameworks, architectures, and discontinuous interfaces between tools for each lifecycle stage creates enormous complexity. Docker simplifies and accelerates your workflow, while giving developers the freedom to innovate with their choice of tools, application stacks, and deployment environments for each project.
You can get Docker from its official site.
First, let's create our requirements.txt; this will have all our python package requirements to use identical packages versions.
fastapi==0.57.0
uvicorn==0.11.5
pydantic==1.5.1
starlette==0.13.4
python-multipart==0.0.5
requests==2.24.0
scikit-learn==0.23.1
joblib==0.16.0
Now the Dockerfile
FROM tiangolo/uvicorn-gunicorn:python3.8-slim

WORKDIR /app ENV DEBIAN_FRONTEND=noninteractive
ENV MODULE_NAME=app ADD requirements.txt . RUN pip install -r requirements.txt \
    && rm -rf /root/.cache
COPY . .
With just those lines, we tell Docker to get a python 3.8 image from the docker hub, that, by the way, it's an image created by the same author of FastAPI. It's optimized to use with this framework; then, we create a new folder where we put all the app code and install the python packages we need.
Now let's create the docker image and run the container.
docker build -t iris-ml-build .
docker run -d -p 80:80 --name iris-api iris-ml-build
Now go to http://127.0.0.1/docs
You should see the same as before, but now it is running in a docker container; you could take this docker image to any cloud provider, and it should remain the same.
Congratulations! now you have your app up and running
You can get the complete code from my GitHub with a few more functionalities:
https://github.com/rodrigo-arenas/fast-ml-deploy
4. Bonus: Load Test
As mentioned at the beginning, the response time of our API may be crucial if we expect to make real-time predictions; we'd expect our API to respond in just a few milliseconds.
We'll use Locust to test how much we can get.
Locust supports running load tests distributed over multiple machines, and can therefore be used to simulate millions of simultaneous users.
you can install it using pip install Locust; according to your OS; you may need additional requirements: https://docs.locust.io/en/stable/installation.html
Create the load_test.py file and place it in the tests folder; it will help us send hundreds of requests to our API.
from locust import HttpUser, TaskSet, task, between

class IrisPredict(TaskSet):
    @task
    def predict(self):
        request_body = {"data": [[4.8, 3, 1.4, 0.3]]}
        self.client.post('/predict', json=request_body)


class IrisLoadTest(HttpUser):
    tasks = [IrisPredict]
    host = 'http://127.0.0.1'
    stop_timeout = 20
    wait_time = between(1, 5)
Run Locust using
locust -f ./tests/load_test.pyNow Locust is running in http://localhost:8089/; we can try our API; we'll send 100 users per second until 1000 requests.

Running in a core i7 laptop, 8 Gb of RAM, and four cores, this is what we get:

As you can see on the Locust report, we sent 5415 requests with an average response time of 6 milliseconds, which means we were able to handle at the end of the test 330 requests per second with 0% of failures.
Pretty nice for our implementation!